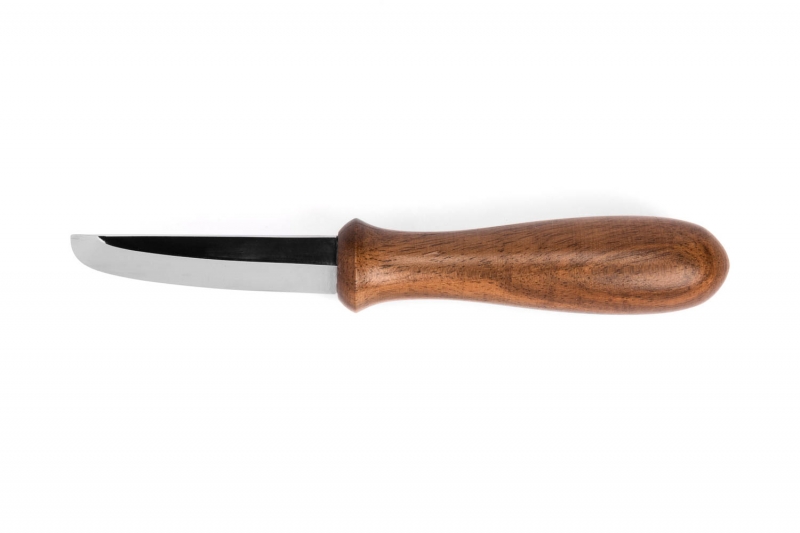
The Pantzier reed knife is basically a single bevel knife with a radius tip. The bevel portion of the blade is sharpened as usual by following the bevel angle. The radius is the tricky part, which requires a compound motion of matching the bevel while raising the handle to match the contour of the tip to come into contact with the stone along the entire radius. This is definitely a more advanced technique. The softness of the steel puts the optimum operating sharpness between 600 and 2,000 grit, and will benefit more from being reinforced with a micro bevel, or secondary bevel.
Okay, this time we have a Regenstuff Panzer knife. Now, this is going to be very interesting because you have this flat bevel here, which is fairly straightforward, but then you have this radius curve, which is always difficult.
Again, the idea is that you can cross over on a bassoon reed, or whatever reed you’re working with, and use this radius to reach the other side without cutting out the middle.
So, this is basically a single bevel for the most part, but we’re going to use a slightly different technique for rounding the tip. We’ll start with the flat bevel here.
I’m going to cheat a little bit because German steels, in general, tend to be softer. They’re usually not that hard on these types of knives. The steel is stainless and generally softer. That doesn’t necessarily mean it’s lower quality; it’s simply a softer steel.
What we’re going to do is reinforce the edge so it doesn’t roll over.
You can see here that the edge has rolled back slightly from use. Right here, there’s a small roll, and that’s because the steel is a little too soft to hold such a thin edge under use.
One thing to understand about these types of knives is that you can’t really sharpen them to an extremely refined edge. If you go too far, the edge can lose some of its strength and rigidity. However, these steels perform very well in the mid-grit ranges. If you understand that, you can adjust your sharpening accordingly.
We’re also going to shape the edge slightly differently so it holds up better during use.
Let’s start with the flat bevel. Follow the existing bevel here. We have a fairly large flat area before reaching the curve, so we’ll sharpen this section just as we would a normal single-bevel knife.
Okay, we’ve covered most of the flat bevel, and we’re already starting to get a burr. Now we have to deal with the radius. You can see how the flat bevel stops right before the curved section. This is the tricky part. Basically, I’m going to lift the handle slightly and continue with a normal sharpening stroke.
Start here, lift the handle, and continue forward. That begins to follow the radius.
It’s a slow process. You can come back with the stroke if you want, but I find it safer to simply lift the handle as you move forward.
You can see what I’m doing here. I start on the flat bevel, move forward, and then gradually transition into the curve. We’re already beginning to sharpen that rounded section.
Sometimes you have to play with the angle a little to reach the very edge. I’m starting to get the entire radius now, and we’ll come back later to blend everything together.
Again, this is much more advanced than what most people are ready for, but it’s necessary if you want to properly sharpen this type of knife.
Because of the buffing that was originally done to the blade, I also need to come back and round this section over properly. This definitely isn’t Sharpening 101. It’s a little more advanced.
Okay, we now basically have a burr running across the entire edge. Don’t worry too much about making the face perfectly polished or aesthetically pleasing. Focus more on forming a consistent burr. That’s the important part here.
Now we’re going to cheat a little. We have a nice burr, but we’re not going to work on the other side just yet. Instead, we’re going to add a small micro bevel. This will help reinforce the softer steel and keep the edge from rolling back as easily during scraping.
Place the main bevel flat on the stone, then raise the angle just slightly. This is where you could place a coin underneath the blade as an angle reference. That’s usually one way to do it. With experience, muscle memory can also help maintain the angle.
You only need to raise the blade a little to create the micro bevel. First, establish the bevel. Because we have this long, flat section, you can move forward or backward here without much trouble.
The tricky part is following the curved contour while maintaining the same angle. The movement actually comes from lifting my elbow.
My angle stays consistent while my elbow rises to follow the radius. I don’t know how much this particular person uses the rounded section of the knife, but we’re still going to put a micro bevel along it.
You can now see the beginning of a secondary bevel forming around the edge. All right. The burr is now very strong here. The back of this knife is supposed to remain flat, so we’re not going to add a secondary bevel to this side. Instead, we’ll keep it flat and remove the burr.
Again, we’re going to apply pressure toward the front of the blade. This removes the burr and transfers it back toward the front.
The edge is now reinforced by the micro bevel we created. From here, we’re simply going to come in and wipe off the remaining burr.
Let me do that again because my hand was in the way. We’ll set the angle, move forward, and then follow the radius. That’s basically the best way to sharpen this type of blade.
Knife: Reeds ‘N Stuff Pantzier
Stone: Naniwa Chosera 600