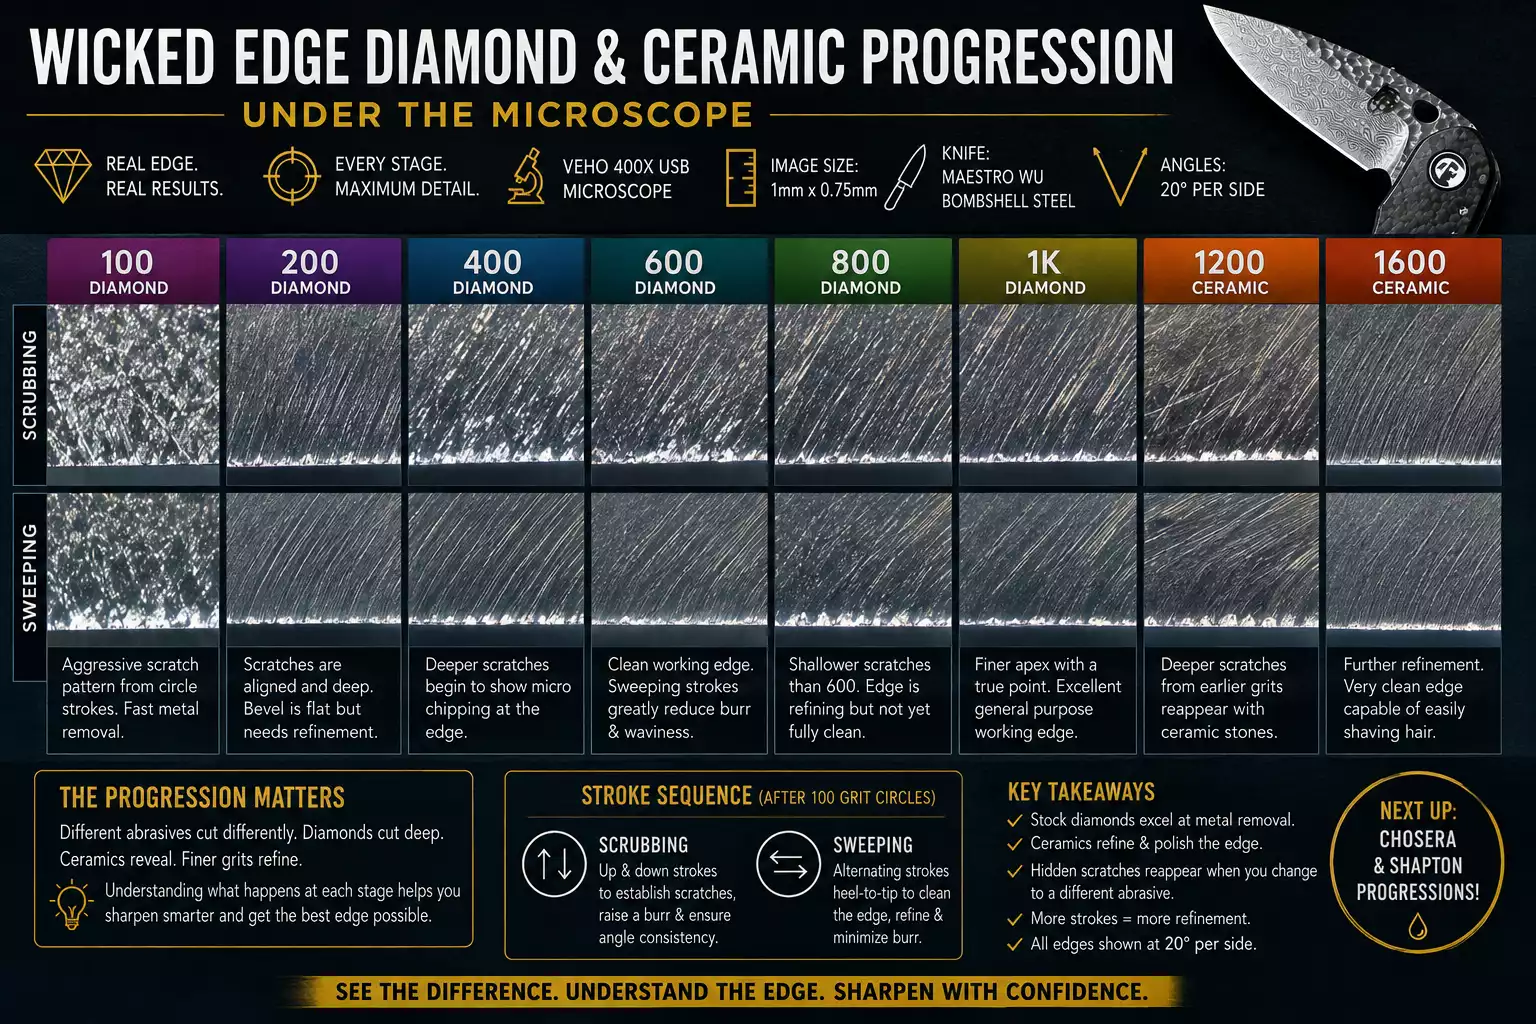
One of the questions I receive most often is how the Wicked Edge diamond stones, ceramic stones, Naniwa Chosera, and Shapton stones compare under magnification. While preparing a video about the Chosera stones, I decided to photograph the complete progression of the standard Wicked Edge diamond and ceramic paddles under a microscope. The results provide a clear look at how each grit changes the bevel and the cutting edge throughout the sharpening process.
In future articles, I’ll cover the complete Chosera and Shapton progressions using the same method, making it easier to compare how each abrasive system refines an edge.
For this demonstration, I sharpened a Maestro Wu Bombshell Steel folding knife at 20 degrees per side. Every microscope image was captured using a Veho 400x USB microscope, with each photograph covering an area approximately 1 mm wide by 0.75 mm high.
Establishing the Bevel
When sharpening a new knife, I normally begin with the 100-grit Wicked Edge diamond stones using circle strokes.
Circle strokes remove steel quickly because the diamonds cut from multiple directions instead of following a single scratch pattern. This aggressive action helps establish the bevel much faster than straight strokes.
Under the microscope, however, the scratch pattern appears random and deep. The bevel looks almost crystalline, with scratches running in many directions. Those deep scratches must eventually be removed because they can contribute to micro-chipping as the edge becomes thinner during later stages of sharpening.
Refining the 100 Grit Edge
Once the bevel reaches the target angle, I stop using circle strokes and switch to scrubbing strokes.
Scrubbing consists of straight up-and-down movements over a small section of the edge. These strokes replace the random scratches from the circle pattern with scratches that all run in the same direction while maintaining a flat bevel.
Although the bevel now looks much cleaner, the scratches are still deep and the edge is not yet ready for the next grit.
The final step at each grit is sweeping strokes.
Sweeping strokes move across the entire edge from heel to tip using alternating passes on each side of the knife. This removes the slight waviness created during scrubbing while reducing burr formation.
From this point forward, I no longer use circle strokes. Every remaining grit follows the same sequence:
- Verify the sharpening angle with a digital angle cube.
- Perform scrubbing strokes until a burr forms.
- Finish with sweeping strokes to refine the bevel and clean the apex.
200 Grit Diamond
The 200-grit diamond stone begins replacing the deep scratches left by the 100 grit.
Under magnification, some of the original scratches from the circle strokes are still visible, but they become much less pronounced after the sweeping strokes.
400 Grit Diamond
The 400-grit diamond stone begins revealing some of the finer details along the cutting edge.
One interesting observation under the microscope is that some deeper scratches terminate at small micro-serrations along the apex. These are still completely normal at this stage and are easily removed by the following grit.
600 Grit Diamond
By the time the knife reaches the 600-grit diamond stone, the edge has developed into what I consider a basic working edge.
The microscope clearly shows how much cleaner the sweeping strokes leave the apex compared with scrubbing alone.
WEPS 600 Diamond – Scrubbing
At this stage, many Wicked Edge users choose to stop sharpening.
Others continue with:
- 800 and 1,000 grit diamond stones
- 1,200 and 1,600 grit ceramic stones
- Leather strops with diamond compounds
- Chosera stones
- Shapton stones
For this progression, we’ll continue through the standard diamond and ceramic paddles.
800 Grit Diamond
My 800-grit and 1,000-grit diamond stones are newer than the lower-grit stones, so they still cut a little more aggressively than fully broken-in diamond plates.
Even so, the microscope shows that the bevel scratches become noticeably shallower compared with the 600 grit, although the apex itself is not yet significantly cleaner.
1,000 Grit Diamond
The 1,000-grit diamond stone further smooths the bevel while refining the cutting edge.
Compared with the 600-grit edge, the apex now forms a much finer point instead of the slightly flattened appearance seen at lower grits.
At this stage, the knife has reached what I consider an excellent general-purpose working edge.
Moving from Diamonds to Ceramic Stones
The Wicked Edge diamond progression ends at 1,000 grit, after which the ceramic stones take over for additional refinement.
This transition highlights an important characteristic of different abrasive types.
Diamond stones cut deeply because the diamonds protrude from a rigid metal surface.
Ceramic stones produce shallower scratches.
As a result, scratches left behind by the diamond stones that appeared to be gone often become visible again when sharpening with ceramics.
The ceramic stones are not creating new deep scratches—they’re exposing scratches that were already present beneath the previous finish.
1,200 Grit Ceramic
The 1,200-grit ceramic stone demonstrates this effect clearly.
During scrubbing, several scratches running across the primary scratch pattern become visible.
After sweeping, these scratches remain noticeable, indicating they originated from a much coarser grit earlier in the progression.
The width of these scratches suggests they were created by a significantly coarser abrasive, possibly around the 400-grit stage.
These remaining scratches also create small serrations along the edge.
Fortunately, the solution is simple.
Either:
- Return to the finer diamond stones for additional refinement, or
- Spend more time on the 1,200 ceramic until those scratches are completely removed.
1,600 Grit Ceramic
The progression finishes with the 1,600-grit ceramic stone.
A few deeper scratches remain visible during the scrubbing stage, but after additional sweeping strokes, the bevel becomes much more uniform and the apex is significantly cleaner.
The finished edge is capable of easily shaving arm hair and provides a smooth transition into stropping compounds or polishing stones if additional refinement is desired.
Final Thoughts
Viewing the sharpening process under magnification provides a much better understanding of what each grit actually contributes to the edge.
One of the biggest takeaways from this progression is that different abrasive materials remove steel in different ways. Diamond plates, ceramic stones, and water stones each leave their own scratch patterns, which explains why deeper scratches sometimes reappear as you progress through finer abrasives.
Understanding what happens at each stage makes it much easier to troubleshoot scratch patterns, choose the next sharpening step, and decide whether additional work is needed before moving to a finer stone.
In the next articles, I’ll examine the Naniwa Chosera and Shapton Wicked Edge stone progressions under the microscope to show how they compare with the standard Wicked Edge diamond and ceramic paddles.
Useful link – https://jendeindustries.com/product/wicked-edge-chosera-water-stone/
Do some with the strops 🙂
Yessir! I doubt I will match your ability with them, though, Clay! 🙂
I’d love to see pics using Strops ;-)! Thanks for all three ‘testing/reviewing.
Btw… can I use any of these photo’s on my website http://www.sharperthannew@gmail.com?
Hi Krystina! Thanks for reading! Feel free to use these photos to help your sharpening business. A small “courtesy of Tom Blodgett” would be nice 🙂 We’ve got a good thread going on the Wicked Edge Forum about the strops. I will probably write that up here soon. Thanks again!
This is very informative. I’ve always wanted to get a USB microscope to make videos of grit progressions on the Wicked Edge. When I get a good microscope I will be uploading the video to my YouTube channel here: http://www.youtube.com/user/M0DiFiEDZ/videos
Thanks for the pics, it gives me a good idea of the image quality I can expect the videos to look like.
Reblogged this on MODiFiEDZ Blog and commented:
This is a really great blog & a must read if you enjoy spending time sharpening your own knives or your interested in how the cutting edge of a knife is so sharp, under a microscope.